Preferences
You can change the configuration of Aseprite from the Edit > Preferences menu or pressing Ctrl+K key (or ⌘K or ⌘, on macOS). In case that you are looking to configure the keyboard shortcuts, that's done through the Edit > Keyboard Shortcuts menu option.
The Aseprite preferences are stored in aseprite.ini in the preferences folder.
The Preferences dialog is divided in several sections:
General
-
User Interface:
One window mode
 : Menus cannot be moved outside of the main Aseprite menu.
Multi-window mode
 : Menus can be moved outside of the main Aseprite menu.
 -
Light | Dark options: Since v1.3, you can quickly change between a Light version of the Aseprite theme and a Dark one.
-
Screen Scaling: Changes the size of each pixel inside every window of Aseprite. It's 200% by default, which means that each pixel in the window will be represented with a 2x2 square on the screen. When using large monitors (e.g. 4K monitors), you can try changing to 300% or 400%. If you want to see each pixel of your sprite represented as one pixel on the screen, you should set this option to 100%, in this case it's highly probable that you will want to increase the next option (UI Elements Scaling) to 200% or more if needed.
-
UI Element Scaling: It's an extra scale applied only to elements of the User Interface (buttons, labels, etc.), but without modifying the scale of the sprite editor. It's 100% by default.
-
Language: The language of the User Interface, English by default, but you can get some translations contributed by users from: https://github.com/aseprite/languages.
-
Show Aseprite menu bar (only available on macOS): The Aseprite menu bar is visible by default on Windows and Linux:

But it's hidden by default on macOS, as in macOS you can use the system menu bar:

-
Show Aseprite file dialog: Use custom Aseprite file viewer menu.
-
Show Home tab when Aseprite is started: Shows the Home tab when Aseprite is started.
-
Expand menu bar items on mouseover: With this option checked, when the mouse is above the Aseprite menu bar, a menu will be opened automatically. By default this is disabled, so you have to click a menu to open it.
-
Draw a separation between each palette entry: Draws a black 1px line between each palette entry in the color bar.
-
Share crash data with Aseprite developers: When Aseprite crashes (unexpectedly closes) you will be asked to share some crash information automatically in the future privately with the Aseprite team. Aseprite doesn't do this by default (this option is unchecked by default), so you have to give your consent to share this information. More details in #2857.
Tablet
See the tablet section.
Files
- Default extensions: Pick the default file extensions for saving/exporting actions.
- Recent Items: The number of recent file/folder items to show on the home page and File > Open Recent dropdown.
- Recover files options: These options handle the intervals to save sprite recovery data.
Color
-
Alpha & Opacity Ranges: Whether alpha/opacity color ranges use
0-255or0%-100%ranges.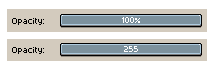
-
Color management: See the color profile section.
Alerts
Several (non-undoable) actions on Aseprite show a warning message with a Don't show this alert again checkbox:
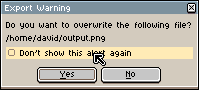
You can re-enable these dialogs from Edit > Preferences > Alerts.
Editor
Options to change the general behavior of the Sprite Editor:
- Zoom with scroll wheel: Checked by default, you zoom with the mouse wheel (if you uncheck this, the vertical scroll will be the default action for the mouse wheel).
- Zoom sliding two fingers up or down (macOS): This is available on macOS only, and if you enable it you will be able to zoom using two fingers on your MacBook trackpad.
- Zoom from center with scroll wheel: Check this if you want to zoom from the center of the sprite editor instead zooming from the mouse position when the mouse wheel is used.
- Zoom from center with keys: Zoom from the center of the sprite instead of the mouse position when you use the keys to zoom 1, 2, 3, etc.
- Show scroll-bars in sprite editor: Uncheck this to hide the scroll bars on all sprite editors.
- Auto-scroll on editor edges: With this option checked, when you are drawing (have the mouse button pressed) and the mouse touches the edges of the sprite editor, it will scrolls automatically.
- Auto-fit on screen when a sprite is opened: When it's checked, after you create a new sprite or open an existing one, the editor will show the whole image fitting it in the available space of the canvas. When this option is unchecked (the default option), the initial zoom level will be 100% by default.
- Preview straight line immediately on Pencil tool: When you use
the
 Pencil tool, pressing
the Shift key will draw a straight line from the last painted
point. With this option checked, you will see the line preview
immediately after pressing the Shift key (instead of
waiting for the mouse button). If this is too annoying for you, you
can uncheck the option.
Pencil tool, pressing
the Shift key will draw a straight line from the last painted
point. With this option checked, you will see the line preview
immediately after pressing the Shift key (instead of
waiting for the mouse button). If this is too annoying for you, you
can uncheck the option. - Discard custom brush when eyedropper is used: If you create a
custom brush with Edit > New Brush option, using the eyedropper
 tool will change
the color of your brush. Checking this option, after picking a color
with the eyedropper, the custom brush will be completely discarded
and a regular brush with the picked color will be selected.
tool will change
the color of your brush. Checking this option, after picking a color
with the eyedropper, the custom brush will be completely discarded
and a regular brush with the picked color will be selected. - Downsampling: The algorithm to use to show the sprite when the zoom level is <= 50%. By default it's Bilinear mipmapping.
- Right-click: You can customize what specific action to do with the right-click.
Selection
-
Adjust opaque/transparent mode automatically: Adjust the opaque/transparent mode when moving over a layer, e.g: moving over a transparent layer would set the mode to transparent.
-
Keep selection after "Edit > Delete" command: Keep the selection bounds after deleting the content.
-
Show selection edges automatically when the selection is modified: Automatically enables View > Show > Selection Edges when the selection is moved. This will override the menu setting (e.g: if View > Show > Selection Edges is disabled, this will enable it)
-
Allow moving selection edges: Enabling this allows moving the selection bounds. The selection can only be moved if the mouse is hovering over its edge (the marching ants).
-
Disable transformation handles when key modifiers are pressed: Disable transformation handles when key modifiers (Shift/Ctrl/Alt) are pressed.
-
Move selection on Add mode: Enables moving the selection in the Add selection mode.
-
Select a grid tile with double-click: Enables selecting grid tiles with a double-click.
-
Snap To Grid when the option is enabled: Snap To Grid when View > Grid > Snap to Grid is enabled.
-
Force RotSprite even for right/straight angles: Use the RotSprite rotation algorithm for right/straight angles.
-
Transform cels in selected layers or frames on timeline: Selection transformations apply to all cels of the selected layers/frames. If this option is disabled, selection transformations will only apply to all selected cels.
Timeline
- Show timeline automatically: Shows the timeline when a new frame or layer is added.
- Rewind on stop: Upon stopping, the current frame is reset to the frame the animation was started at (note that it can be a frame other than the first frame).
- Default First Frame: Sets the default first frame.
- Keep selection: Keep the timeline selection range when the canvas is edited or the timeline loses focus.
- Select on Click: Select frames/cels on click.
- Select on Shift + Click: Select frames/cels on Shift + Click.
- Select on Drag: Select frames/cels when dragging.
- Drag & drop from edges: Enable dragging and dropping from frame/cel edges.
Cursors
-
Use native mouse cursors: Use the OS's cursor. If disabled, use the custom theme cursor.
-
Mouse cursor scale: Scale of theme cursor.
-
Crosshair Type: Change the crosshair type when painting.
-
Brush Preview: Change the brush preview type when painting.
-
Crosshair & Brush Edges Color: Change the edge color of the crosshair and brush preview edges.
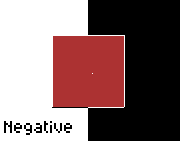
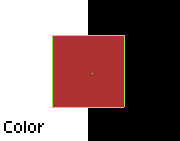
Background
Background for New Documents: Edits the default background for all new documents.
Background for the Active Document: Edits the current document background.
- Size: Sets the background square sizes.
- Colors: Sets the background square colors.
Grid
Grid for New Documents: Edits the default grid for all new documents.
Grid for the Active Document: Edits the current document grid.
- X & Y: X and Y grid offsets.
- Color: Grid line color.
- Opacity: Grid line opacity.
- Visible Pixel Grid: Enables/disables the pixel grid.
- Color: Pixel grid line color.
- Opacity: Pixel grid line opacity.
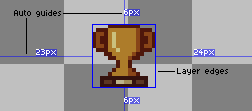
Guides & Slices
-
Layer Edges Color.: Layer edge guide color.
-
Auto Guides Color: Auto guide color.
-
Default Color: Default slice edge color.
Undo
- Undo Limit: The memory limit for undo information, in megabytes, for each sprite.
- Go to modified frame/layer: Sets the current frame/layer to the one where the undo occurred.
- Allow non-linear history: Undo history is a list of sprite states. If non-linear undo history is disabled and undo is used (which moves the current state back one entry), the next action will overwrite the undone action/state. If it is enabled and undo is used, the next action will add the new sprite state to the list, keeping the old one intact.
- Show Undo Tooltip: Show the undo tooltip in the bottom right corner of the window.
Aseprite Format
- Cel Content Format: Changes the cel image format. See https://github.com/aseprite/aseprite/blob/main/docs/ase-file-specs.md#cel-chunk-0x2005.
Experimental
These features are experimental, and may be removed or changed in the future, which is why they are not listed here.
Reset
The Reset section contains various editor values to reset.
To reset a value, select it and press the Reset button.
SEE ALSO
Preferences Folder | Reset Preferences | Keyboard Shortcuts | Customization