Keyboard Shortcuts
You can customize the keyboard shortcuts or the combination of keys + mouse wheel (or mouse movement) from Edit > Keyboard Shortcuts menu option or Ctrl+Alt+Shift+K key (or ⌥⇧⌘K on macOS).
There is a general overview of the default keyboard shortcuts in the Quick Reference page.
Menus & Commands
In these sections you will find a way to assign a key to every action/command in Aseprite that is accessible from the menu bar and other commands that are not part of the main menu but are still accessible for advanced users (e.g. "Set Ink Type" is not associated to any menu or has default keyboard shortcut, but you can assign a key from the "Commands" section).
Remember to use the search field in this dialog to filter and find a specific command.
Tools
In the Tools section you will find a way to see and change the keys associated with each tool from the Tool Bar. There are two main considerations:
- Two or more tools can share the same key. In this case pressing the
key multiple times will switch/go through all the tools that have
the same key assigned. E.g. U key is assigned to the
 Rectangle and
 Filled Rectangle
by default, so pressing one time
will select the Rectangle tool, and pressing it a second time will
switch to the Filled Rectangle.
Filled Rectangle
by default, so pressing one time
will select the Rectangle tool, and pressing it a second time will
switch to the Filled Rectangle. -
There are two ways to select a tool:
- A regular way to change the
active tool, it's when you press a key and the active tool changes so
all the following mouse buttons will interact with that tool.
E.g. pressing the P key switches to the
 Pencil
tool, or the H key selects the
Pencil
tool, or the H key selects the  Hand
tool as the active one, so then you can pan the sprite editor
just dragging it with the left mouse button + moving the mouse
without pressing any other key.
Hand
tool as the active one, so then you can pan the sprite editor
just dragging it with the left mouse button + moving the mouse
without pressing any other key. -
An alternative quick way (identified as "(quick)" in the Keyboard Shortcuts dialog) where the tool is active while you keep the key pressed (and then Aseprite returns to the previously selected tool when you release the key). This happens with the Alt key to select the
 Eyedropper tool
or the Space bar key to select the Hand tool temporarily.
Here an example of how the Hand tool
looks in the configuration:
Eyedropper tool
or the Space bar key to select the Hand tool temporarily.
Here an example of how the Hand tool
looks in the configuration: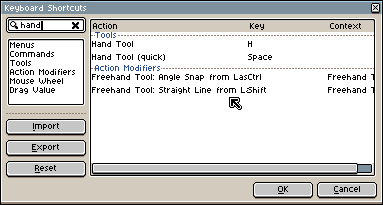
- A regular way to change the
active tool, it's when you press a key and the active tool changes so
all the following mouse buttons will interact with that tool.
E.g. pressing the P key switches to the
Action Modifiers
These actions depend on a specific context in Aseprite, for example when you have a selection tool, or you are scaling a selection, etc. The given keys are the default options.
The following is the list of contexts and the possible actions inside that context:
-
Freehand Tool: When the Pencil tool
is active.
- Straight Line from Last Point: Use the Shift key to create a straight line from the last painted pixel with the brush.
- Angle Snap from Last Point: Add the Ctrl key to snap the angle of that straight line.
-
Move Tool: When you are using the
 Move tool.
- Auto Select Layer: If you press the Ctrl (or ⌘ on macOS) you'll select the layer that is above the cursor with a single click.
-
Shape Tool: These keys can be used while you are drawing (after pressing & before releasing the mouse button)
with a rectangular or elliptical-like tool (e.g. Rectangle,
 Ellipse,
 Rectangular Marquee, etc.).
- Square Aspect: You can use the Shift key to create a square or a circle.
- Draw From Center: You can use the point where the mouse was pressed as the center of the shape when pressing the Ctrl key, e.g. to create an ellipse specifying the center (instead of both corners).
- Rotate Shape: Pressing the Alt you start rotating the shape.
- Move Origin: You can press the Space key to move the whole shape to a new position before releasing the mouse button, just in case the origin was not specified correctly.
-
Selection: When we have any selection tool we can use some keys to
change what to do with the selected area.
- Add/Subtract/Intersect Selection: These options are explained in the Selecting section.
-
Translating Selection: When you're moving the selection.
- Snap To Grid: Pressing Alt the selection will snap to grid.
- Lock Axis: You can use Shift to lock the movement in the X or Y axis only.
- Copy Selection: With Ctrl key you can copy the selection if you press it before you start moving the selection.
- Fine Translating: When you are moving the selection, pressing the Ctrl will start a fine-tuning movement (not only pixel by pixel, but by subpixels).
-
Scaling Selection: When you're scaling the selection.
- Maintain Aspect Ratio: Press Shift key to keep the ratio between width/height intact.
- Scale From Center: Scale from the center (or current pivot position) using the Alt key.
- Fine Scaling: When you are scaling the selection, pressing the Ctrl will start a fine-tuning scaling (not only pixel by pixel, but by subpixels).
-
Rotating Selection: When you're rotating the selection.
- Angle Snap: You can use the Shift key to snap the angle to angles of 26.6°, 45°, 90°, etc.
- Trigger Left/Right Mouse Button: You can configure a specific key to simulate the left/right mouse buttons inside the sprite editor.
Keyboard + Mouse
You can configure to trigger some special actions when a key is pressed and the mouse wheel is moved (or the mouse itself is moved in a specific axis):
SEE ALSO