Slices
With the Slice tool  (Shift+C key) you can indicate regions of your sprite and
assign a name/label to that region with some extra user defined
information. There is support to specify
9-slices/9-patches
information.
(Shift+C key) you can indicate regions of your sprite and
assign a name/label to that region with some extra user defined
information. There is support to specify
9-slices/9-patches
information.
With this tool you can:
- Create a new slice marking a rectangular region pressing the mouse button, dragging the mouse, and releasing the button.
- If the marked rectangle touches existing slices, those slices will be selected.
- You can drag-and-drop a set of selected slices to move them to other place. Or you can resize the whole set of slices dragging from the corners or edges.
- After selecting some slices you can delete them pressing the Delete key or Edit > Delete menu option.
- Double-clicking a slice you will see the Slice Properties dialog.
Slice Properties
If you double-click a slice, you will see its properties:
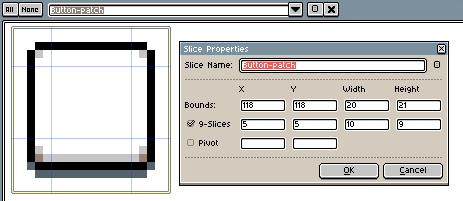
Here you can specify:
- the bounds of the slice in the canvas
- a 9-slices property to specify an internal rectangle to sub-divide the bounds into sub-slices
- a pivot to specify the central/base location of the sprite inside the slice
Exporting Slices
You can export each slice as a different sprite using the --split-slice option.
You can also export the slice information in a sprite sheet JSON using the --data option or the File > Export Sprite Sheet menu option with the JSON output checked. This is an example of the exported data:
{ ...
 "meta": {
  ...
  "slices": [
   { "name": "Button-patch",
     "color": "#0000ffff",
     "keys": [{ "frame": 0,
                "bounds": {"x": 118, "y": 118, "w": 20, "h": 21 },
                "center": {"x": 5, "y": 5, "w": 10, "h": 9 } }] }
  ]
}
SEE ALSO