Layers
One sprite can be subdivided into several layers. You can see them in the timeline:
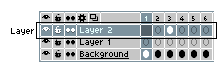
Each layer has several options:
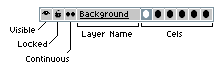
Layer Name: Text to identify this layer. You can change the layer name by double-clicking the layer, or from the Layer > Properties menu (Shift+P key).
Cels: A set of cels, frames that contain something visible for this specific layer in the specific frame.
Visible: It indicates if the layer is visible  or hidden
  . You can switch the layer visibility
using Layer > Visible menu or Shift+X key.
. You can switch the layer visibility
using Layer > Visible menu or Shift+X key.
Locked: If the layer is locked  , you cannot draw on it.
By default all layers are unlocked/editable
, you cannot draw on it.
By default all layers are unlocked/editable  .
.
Continuous: This option is used to indicate what kind of cels you prefer when they are created for this specific layer. See the Continuous Layers section for more information.
Common Operations
Background Layer
The background layer is an opaque layer (without alpha/transparent
component) that cannot be moved. It's created by default when you
select an opaque color in the File > New window, or when you open a
file (e.g. a .png file) that doesn't contain the alpha component.
A sprite can contain only one background layer and it's always at the bottom of the layers stack in the timeline.
When you select a portion of the background layer and clear it (using Edit > Clear menu), the selection will be cleared with the active background color.
Transparent Layers
All layers with an alpha channel are called transparent layers.
You can have several of these in the same sprite.
You can stack them as you want using the timeline.
And you can displace these layers using the Move tool  ).
).
When you select a portion of a transparent layer and clear it (using Edit > Clear menu), the selection will be cleared with transparent color.
You can use Layer > New > New Layer menu or Shift+N to create a new transparent layer.
Background from Layer
If there is no background layer, you can convert any transparent layer to the background using the Layer > Convert To > Background menu. All transparent pixels will be filled with the active background color.
Previously, on Aseprite v1.2 the option was Layer > Background from Layer
Layer from Background
If you want to convert the background to a transparent layer
(e.g. because you want to move it with the Move tool
), you can use the
Layer > Convert To > Layer menu.
Previously, on Aseprite v1.2 the option was Layer > Layer from Background
Layer Group
You can group layers to handle a set of layers as one unit.
Tilemap Layer
Since Aseprite v1.3, you can create tilemap layers from Layer > New > New Tilemap Layer menu or using Space+N. You can also use Layer > Convert To > Tilemap from any regular transparent layer (the tiles will be created from the active grid settings).
New Layers from Selection
- Ctrl+J or ⌘J: Copies the selection and creates a new layer from it
- Ctrl+Shift+J or ⇧⌘J: Cuts the selection and creates a new layer from it
SEE ALSO